

Genshin Impact Mitya Character Strategy and Build Guide

Character Overview and Core Attributes
Mitya introduces a revolutionary combat archetype in Genshin Impact Version 7.2 as a 5-Star Electro Catalyst character hailing from Snezhnaya. Designed around the constellation Nodus, Mitya fundamentally elevates the Superconduct reaction from a physical debuff into a high-frequency offensive powerhouse named Starlight Superconduct. By converting Electro and Cryo interactions into scaling elemental resonance pulses, Mitya delivers sustained on-field damage while simultaneously enabling off-field synergies for premier Cryo and Electro allies.
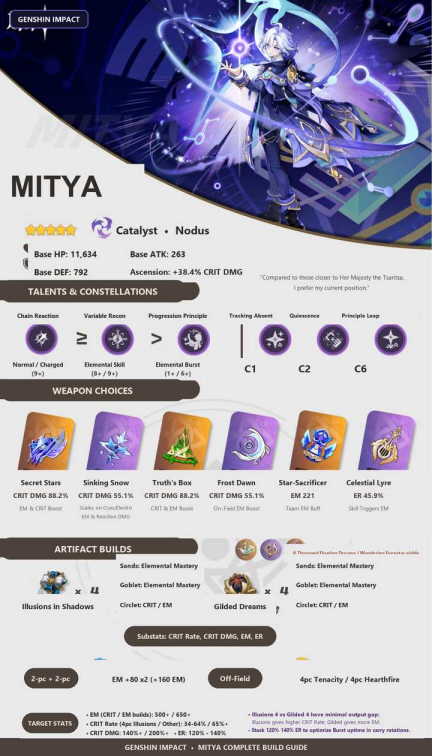
| Attribute | Base Value (Lv. 90) | Ascension Bonus | Strategic Impact |
| Health Points (HP) | 11,634 | — | Solid defensive foundation for on-field catalytic survivability. |
| Attack (ATK) | 263 | — | Moderate base attack; damage scales heavily through Elemental Mastery. |
| Defense (DEF) | 792 | — | Standard catalyst resilience against incoming physical and elemental blows. |
| CRIT Damage | 88.4% | +38.4% at Ascension 6 | Provides immense flexibility when building artifact sub-stats. |
Combat Mechanics and Ability Priority
Mitya operates through an interwoven skill-and-attack loop that maintains continuous Starlight Superconduct uptime, transforming catalytic reactions into heavy AoE elemental damage.
• Normal & Charged Attack (Chain Reaction): Casts rapid sequence Electro projectiles. When his Elemental Skill is active, his basic attacks become enhanced Starlight strikes that bypass standard internal cooldowns, allowing continuous reaction procs. Leveling this talent directly increases personal on-field carry potential.
• Elemental Skill (Variable Recon): Deploys an automated reconnaissance zone that deals periodic field-wide Electro damage. Active characters within the field trigger synchronized Starlight pulses upon dealing Cryo or Electro damage, generating elemental particles and maintaining constant elemental resonance.
• Elemental Burst (Progression Principle): Creates a sprawling celestial calculation matrix that detonates existing Starlight marks, dealing high AoE Electro burst damage and amplifying party-wide reaction vulnerability by 25% for 15 seconds.
| Talent Name | Type | Priority | Recommended Level | Key Combat Role |
| Chain Reaction | Normal / Charged Attack | High | Level 9+ | Main source of on-field catalytic damage during skill stance. |
| Variable Recon | Elemental Skill | High | Level 8+ / 9+ | Deploys reconnaissance pulse, particle battery, and Starlight aura. |
| Progression Principle | Elemental Burst | Medium | Level 6+ / 8+ | AoE burst detonation, debuff amplification, and damage scaling. |
Constellation Milestones and Pull Value
Mitya provides a complete, high-impact gameplay experience at Constellation 0. Subsequent constellations offer substantial comfort, resistance reduction, and exponential damage ceilings:
• C1 Tracking Absent: Extends Variable Recon stance duration by 3 seconds and grants additional particle regeneration, completely resolving team Energy Recharge thresholds.
• C2 Quiescence: Triggering Starlight Superconduct shreds enemy Electro and Cryo RES by 30% for 8 seconds. This represents Mitya's premier team-damage spike (~20-25% team DPS boost).
• C4 Resonant Array: Active party members inside the Starlight field receive a flat 120 Elemental Mastery buff and 15% Electro DMG bonus during elemental reactions.
• C6 Principle Leap: Unlocks hyper-carry scaling. Starlight Resonance strikes gain the ability to critically hit with elevated baseline multipliers, transforming Mitya into an apex carry.
Weapon Choices and Artifact Optimization
Comprehensive equipment matrix covering signature weapons, accessible alternatives, artifact sets, and target attribute benchmarks.
Weapon Rankings and Detailed Evaluation
| Weapon Name | Rarity | Main / Sub Stat | Combat Synergy & Recommendation |
| Lexicon of Secret Stars | 5★ Signature | Base ATK / 88.2% CRIT DMG | Best-in-Slot. Grants massive Elemental Mastery and stacking CRIT DMG on Electro-Cryo triggers. |
| Heart of Sinking Snow | 4★ Gacha/Event | Base ATK / 55.1% CRIT DMG | Top 4★ choice. Specifically enhances reaction damage when Cryo and Electro auras coexist. |
| Truth's Box / Floating Dreams | 5★ Alternative | Base ATK / CRIT DMG or EM | Universal 5★ stat sticks offering exceptional baseline consistency across all team formats. |
| Frost Dawn | 4★ Alternative | Base ATK / 55.1% CRIT DMG | Consistent on-field CRIT stat stick with localized Elemental Mastery burst windows. |
| Star-Sacrificer | 4★ Craftable | Base ATK / 221 EM | Premier F2P option. High flat EM with party-wide EM sharing upon triggering elemental skills. |
| Celestial Lyre | 4★ Utility | Base ATK / 45.9% ER | Energy-focused option facilitating smooth, continuous Burst rotations in solo-Electro lineups. |
Artifact Configuration and Substat Priorities
• 4-Piece Illusions in Shadows: Best-in-Slot choice. Amplifies continuous skill-based Starlight strikes and stacks high CRIT Rate during active combat stances.
• 4-Piece Gilded Dreams: Highly competitive alternative. Provides massive flat Elemental Mastery and percentage ATK boosts based on party elemental composition.
• 2-Piece + 2-Piece EM Sets: Universal transitional option providing a reliable +160 Elemental Mastery baseline without condition constraints.
Main Stats: Recommended Main Stats: Sands of Eon (Elemental Mastery) • Goblet of Eonothem (Elemental Mastery or Electro DMG) • Circlet of Logos (CRIT Rate / CRIT DMG or EM).
Substat Priority: CRIT Rate = CRIT DMG > Elemental Mastery > Energy Recharge (120% - 140%) > ATK%.
| Attribute | Entry / Budget Target | Optimal Benchmark | High-End Ceiling |
| Elemental Mastery (EM) | 500+ | 650+ | 800+ |
| CRIT Rate | 34% - 50% (4pc Illusions) | 65%+ (Generic) | 75%+ |
| CRIT Damage | 140%+ | 180% - 200% | 220%+ |
| Energy Recharge (ER) | 115% - 120% | 125% - 135% | 140%+ (Solo Electro) |
Team Composition Strategy and Synergies
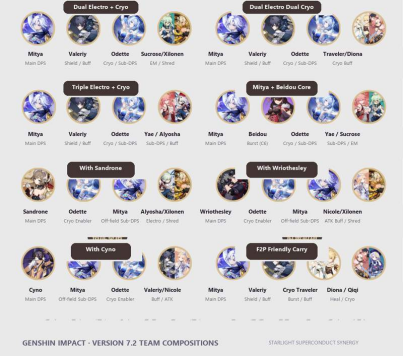
Mitya thrives in coordinated setups combining continuous off-field Cryo application with defensive stability and elemental resistance reduction.
| Archetype | Team Lineup | Core Synergy Mechanics | Operational Focus |
| Dual Electro + Cryo | Mitya + Valeriy + Odette + Sucrose/Xilonen | Standard flagship roster. Odette supplies off-field Cryo, Valeriy shields and batteries, Sucrose provides EM share. | Sustained On-Field Driving |
| Dual Electro Dual Cryo | Mitya + Valeriy + Odette + Traveler/Diona | Guaranteed Cryo aura dominance. High shield safety with dual elemental resonance bonuses. | Defensive Comfort & Stability |
| Triple Electro + Cryo | Mitya + Valeriy + Odette + Yae / Alyosha | Rapid Electro cycling. Overwhelming Electro frequency triggers non-stop Starlight Superconduct. | Maximum Particle Generation |
| Dual Carry Sandrone | Sandrone + Odette + Mitya + Alyosha/Xilonen | Alternating burst windows. Sandrone delivers mechanical bursts while Mitya provides off-field resonance. | Split Burst Windows |
| Wriothesley Enabler | Wriothesley + Odette + Mitya + Nicole/Xilonen | Wriothesley drives on-field melee Cryo attacks, continuously triggering Mitya's coordinated Electro strikes. | Rapid-Fire Cryo Enabler |
| F2P Friendly Carry | Mitya + Valeriy + Cryo Traveler + Diona/Qiqi | Accessible lineup utilizing story and 4-star supports. Excellent survivability and continuous reaction procs. | Low Investment Efficiency |
Cultivation Materials and Talent Farming Roadmap
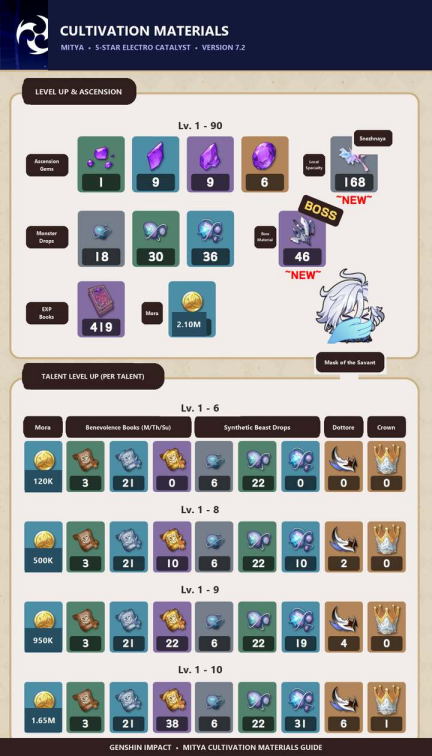
Visual guide covering character ascension from Lv. 1 to 90 and individual talent progression from Lv. 1 to 10.
Material Breakdown and Weekly Farming Schedule
Preparation roadmap detailing item totals, domain availability schedules, and priority acquisition paths for Mitya.
| Category | Material Name | Required Quantity | Acquisition Source & Farm Schedule |
| Ascension Gems | Vajrada Amethyst Sliver / Fragment / Chunk / Gemstone | 1 / 9 / 9 / 6 | Electro Hypostasis, Thunder Manifestation, or Alchemy Transmutation. |
| Local Specialty | Crystallized Pleated Cap | 168 Total | Harvested across Snezhnaya glacial caverns and crystal tundra. |
| World Boss | Shattered Stabilization Anchor | 46 Total | Defeating the Snezhnayan Mechanical Stabilization Prototype boss. |
| Monster Drops | Synthetic Beast Core / Heart / Eye | 18 / 30 / 36 (Lv. 90) | Defeating Synthetic Beast automatons throughout Snezhnaya. |
| Talent Books | Teachings / Guide / Philosophies of Benevolence | 9 / 63 / 114 (10/10/10) | Snezhnaya Talent Domain (Available Monday, Thursday, Sunday). |
| Weekly Boss | Mask of the Savant | 18 Total (10/10/10) | Dottore Trounce Domain Challenge. |
| Crown of Insight | Crown of Insight | 3 Crowns (10/10/10) | Major flagship events and regional offering systems. |
| Mora Currency | Mora | 7.04M Mora Total | Ley Line Outcrops (2.09M for Ascension + 4.95M for 3 Talents). |
| EXP Material | Hero's Wit EXP Books | 419 Books Total | Ley Line Outcrops and regional quest rewards for Lv. 1 to 90. |
Strategic Farming Recommendations
• Domain Planning: Farm the Snezhnaya Talent Domain strictly on Monday, Thursday, and Sunday. Prioritize "Chain Reaction" and "Variable Recon" to Level 8 before farming beyond.
• Weekly Boss Priority: Focus weekly boss attempts on the Dottore trounce domain early to accumulate 18 Masks of the Savant, using Dream Solvents for conversion if needed.
• Specialty Routing: Gather Crystallized Pleated Caps along marked Snezhnayan tundra routes; they respawn every 48 hours in the overworld.